If you've been a follower of mine for a while you will know that I absolutely love Autumn and Halloween. I don't know what it is about this time of year but something inside me just comes alive and i'm suddenly bursting with ideas and creativity again!
Halloween only comes around once a year and this year I've decided to go all out on making a spooky Skeleton Makeup look to remember! I really wanted to create something that was simple but that would also stand out from the crowd.

I have to admit that I have very little experience when it comes to creating looks like this so I decided to enrol the help of my glitter artist friend Claire who I knew could bring a lot of sparkle to my look! I've had the pleasure of experiencing her Luna Glitter Bar first hand and I knew I could trust her in helping me to create something very special.


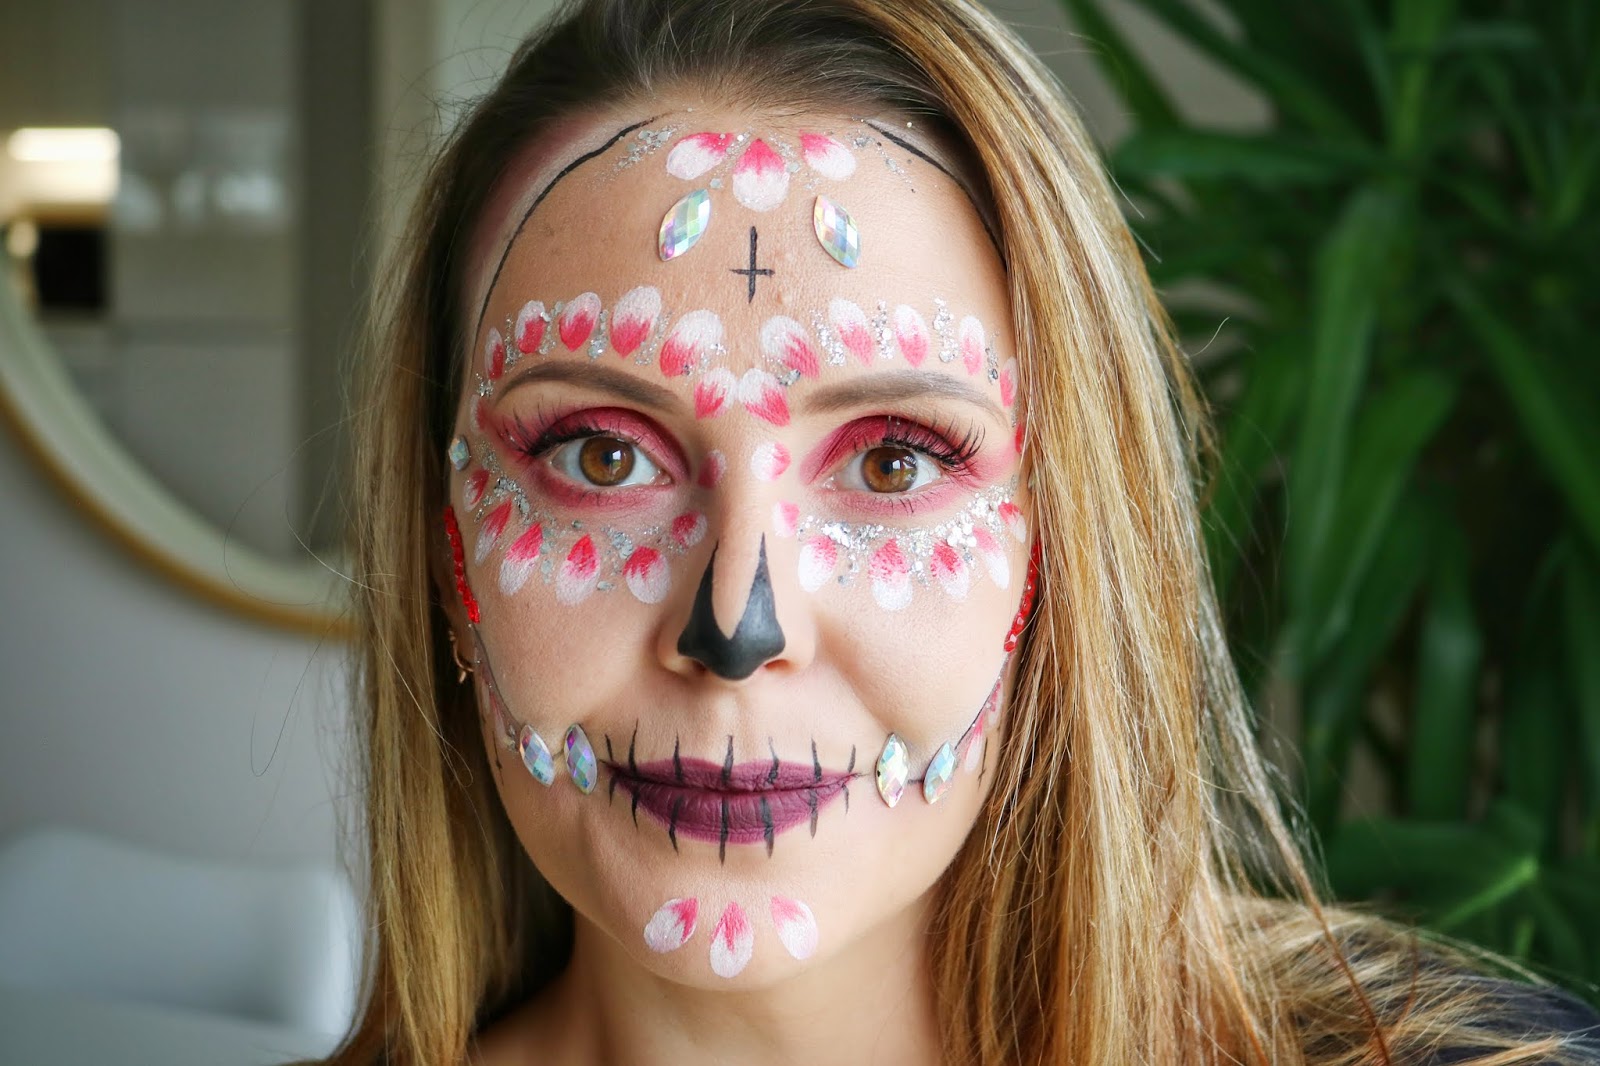
I decided to go for a bold red eyeshadow for my look but I think this would work with any dramatic colour you like including black or dark grey. We used the NYX Brights Ultimate Eyeshadow Palette which is perfect for when you're looking to create a bold or statement look on your eyes.


This look really starts to come together once you add the face paint petals around your eyes and on your chin, cheekbones and forehead. Claire used the Mehron Face & Body Painting Palette and mixed both the white and red shades to create this look by simply pressing and holding the paint brush downwards on my skin. I'd recommend maybe practicing on some paper or the skin on your arm before taking the brush to your face.


Step By Step Tutorial
Step 1 - Apply Foundation Base Layer
The first step is pretty straight forward! Just apply your usual base of foundation and / or concealer.
Step 2 - Apply Eye Shadow
I decided to go for a bold red eyeshadow for my look but I think this would work with any dramatic colour you like including black or dark grey. We used the NYX Brights Ultimate Eyeshadow Palette which is perfect for when you're looking to create a bold or statement look on your eyes.
Step 3 - Contour & Shade
Contouring out a skull on your face is thankfully pretty easy and straight forward. We used the NYX Professional Makeup Jumbo Eye Pencil in the shade Milk. This was perfect for achieving a good skull like shade and it glided over my skin so easily. Once your contour lines are in place simply blend them out a bit with your fingers. These pencils have such a soft and buttery consistency which makes blending them a breeze!
Using a darker eyeshadow shade of your choice, simply shade underneath the contour lines to add some extra definition and achieve the hollowed out cheekbone illusion.
Step 4 - Face Paint Petals
This look really starts to come together once you add the face paint petals around your eyes and on your chin, cheekbones and forehead. Claire used the Mehron Face & Body Painting Palette and mixed both the white and red shades to create this look by simply pressing and holding the paint brush downwards on my skin. I'd recommend maybe practicing on some paper or the skin on your arm before taking the brush to your face.
Step 5 - Add Black Outlines & Nose
Using black pace paint or liquid eyeliner, add black outlines to the contoured areas and create the nose look. A top tip for achieving a realistic skeleton nose is to ensure that you take the shading deep down towards your septum. Noses like this can end up looking more cute and animal like if focused on the top part of the nose. If you fancy adding more to your look then upside down crosses are another haunting touch!
Step 6 - Get Sparkly
Ensure your skeleton look really stands out from the crowd with some sparkly gems and glitter. I couldn't wait for Claire to enhance this look with some extra sparkle! Claire decided to use her own biodegradable silver glitter and using a paintbrush she gently applied glitter around my eyes and to the petals. We also added a few face jewels too for that extra something special! The Barry M Heavenly Wings Face Jewels are ideal for a look like this.
Step 7 - Lips Time
Again, I think a dramatic lip can really help you to achieve a spooky skeleton look and it's up to you what shade you decide to go for. We used the NYX Professional Makeup Soft Matte Lip Cream in the shade Transylvannia. Then with the black face paint or eyeliner draw black lines over your lips to give the impression of teeth.
Step 8 - Make Those Eyes Pop!
To make my eyes pop I added black mascara and the Ardell Magnetic Lashes Accents 001 which i've been loving using on special occasions. It's of course up to you just how dramatic you want to make your eyes look. I think if I was to do this look again I would probably add some liquid black eye liner to make the eyes bolder.
Step 9 - Finishing Touches
To finish off my skeleton Halloween look I of course had to add a bewitching black and silver wig, along with a creepy skeleton hand hair clip. I absolutely loved the end result! What do you think!??

What would you add to your Halloween look to make you stand out from the crowd!??
Maybe you'd like to check out this Zombie Makeup look too!
Maybe you'd like to check out this Zombie Makeup look too!
I'd love to hear some of your own ideas!
* This post is an advertisement feature with Boots UK
All thoughts are my own
All products featured are cruelty free
All products featured are cruelty free
I love this look! This post was so detailed to follow too! x
ReplyDelete